THE SHORT ANSWER
Price a splashback from measured wall area, tile purchasing quantity, edges, penetrations and substrate condition. Keep material selections and installation labour visible so a tile change does not hide the rest of the scope.
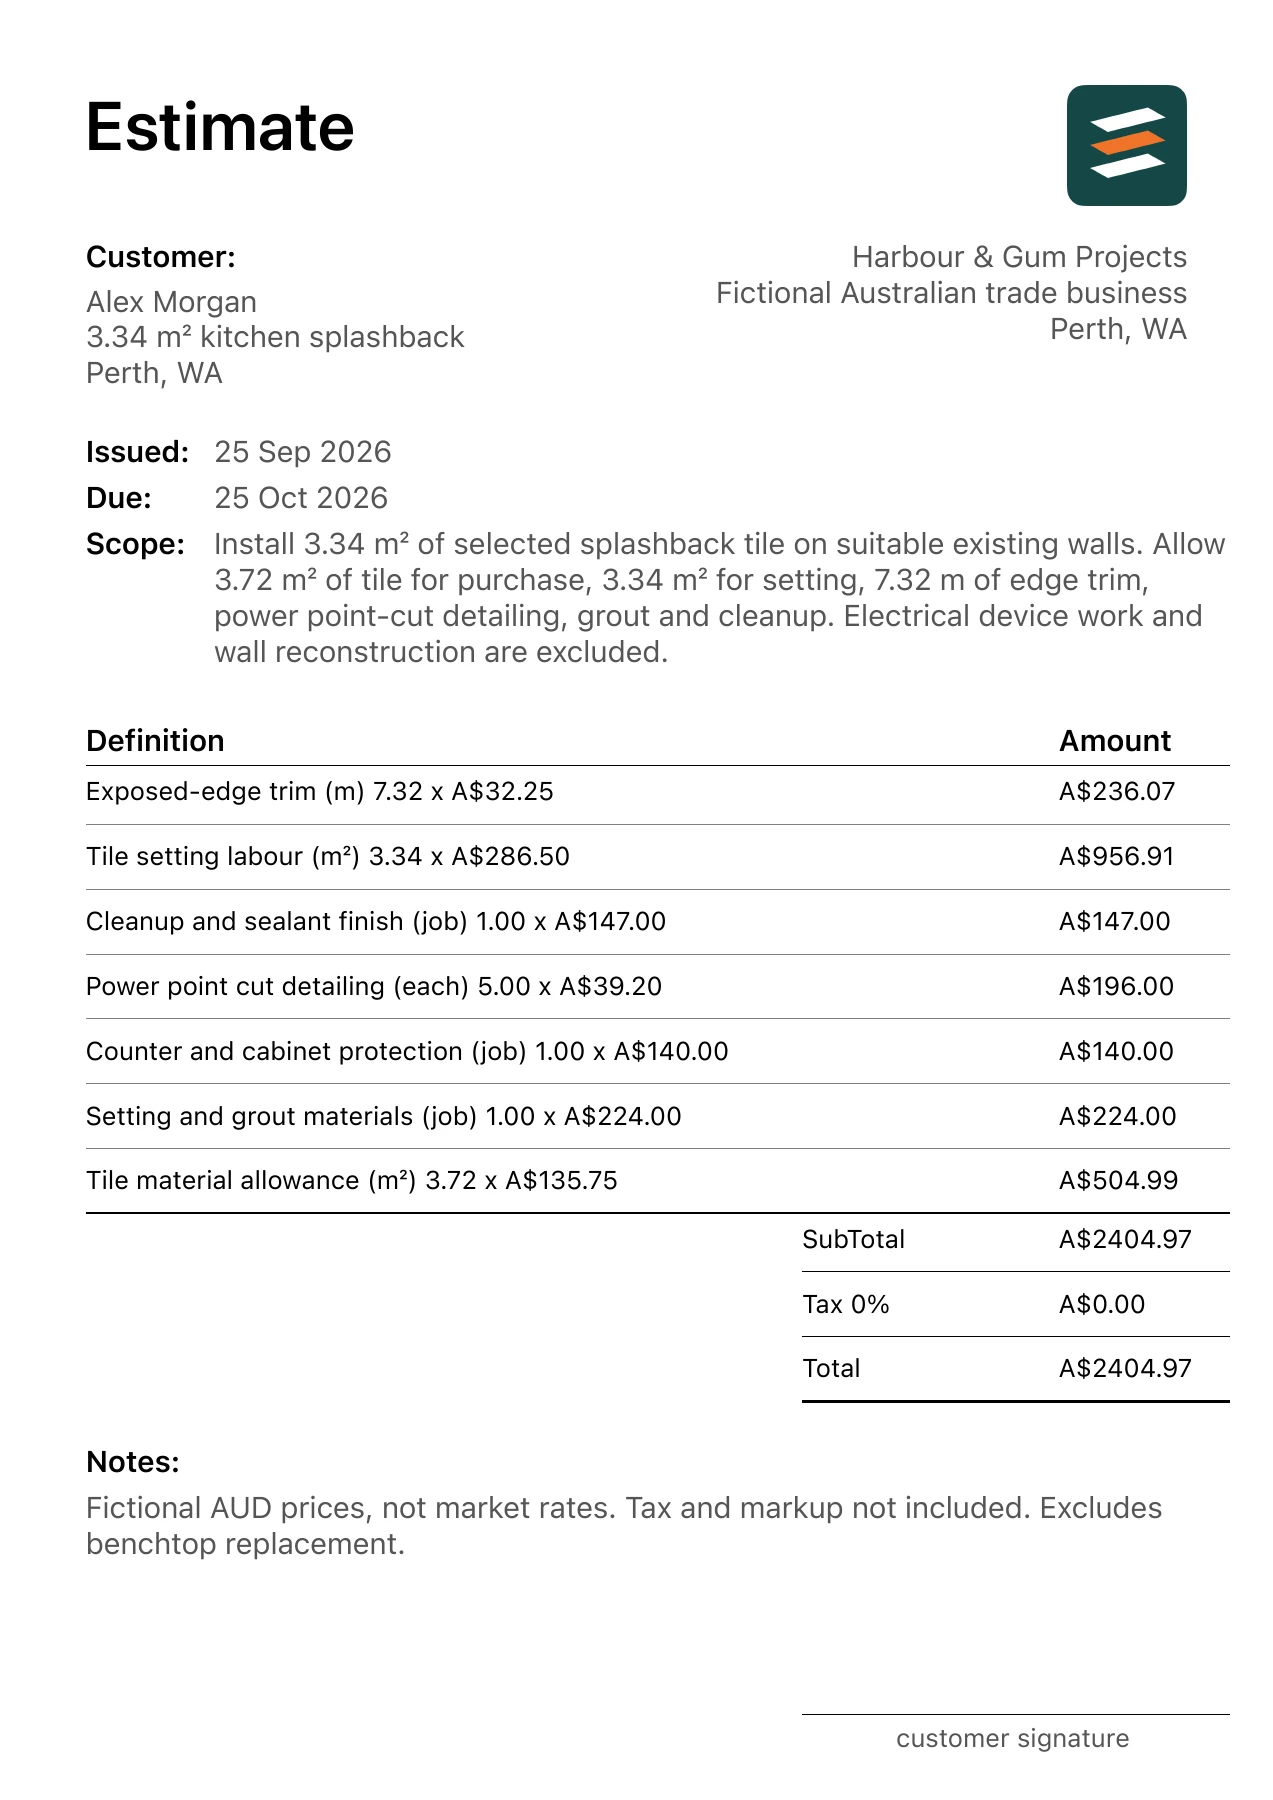
This Australian walkthrough uses a fictional 3.34 m² kitchen splashback in Perth, Western Australia. The matching kitchen splashback installation estimate example shows the same item quantities and amounts in an app-exported PDF. Measure your own site and replace the example rates before issuing a client quote.
1. Measure the splash zones
Record height and length at every wall segment, including behind the range. Note where tile starts and stops at cabinets, windows and open ends; benchtop length alone does not establish tile area.
For this example, the agreed starting scope is: Install 3.34 m² of selected splashback tile on suitable existing walls. Allow 3.72 m² of tile for purchase, 3.34 m² for setting, 7.32 m of edge trim, power point-cut detailing, grout and cleanup. Electrical device work and wall reconstruction are excluded. A change to a listed surface, product or access assumption should trigger a revised line or allowance.
2. Count cuts and exposed edges
Power points and short returns affect layout work. Identify trim length and penetrations separately so a simple field-tile area does not conceal the detailed portions of the job.
3. Confirm tile and substrate
The 3.72 m² purchase allowance is an illustrative takeoff for 3.34 m² installed. Verify the chosen tile, pattern and wall condition before converting it into an order.
4. Define the finish boundary
List grout, sealant, power point-cover handling and cleanup. Any wall repair, benchtop change or electrical alteration should be a separate approved item.
Worked kitchen splashback installation calculation
Two checkable lines from the example are 3.72 m² × A$135.75 = A$504.99; 3.34 m² × A$286.50 = A$956.91. The full 7-line estimate totals A$2,404.97 with the demonstration tax input at 0%. The amount is a fictional scenario, not an Australian market rate or a recommended selling price.
Material purchasing and installed quantities may differ. For your own estimate, use the actual takeoff, supplier prices, labour plan, access and disposal requirements. Decide how overhead, profit and the applicable tax treatment affect your final quote; do not copy the example's zero tax setting.
Before you share the estimate
- Measure each wall segment and end point.
- Record tile format and layout direction.
- Count power points and exposed edges.
- Confirm wall suitability and device responsibilities.
Scope boundary in this example: No benchtop replacement, wall reconstruction, electrical device relocation or specialty tile pattern beyond the described selection.
Confirm the client details and location, item descriptions, measured units, total and validity date. If opening up the work reveals a different condition, document the changed scope and price before proceeding.
Common questions about kitchen splashback installation
Why buy more tile than the installed area?
Cuts and layout can require additional material. State the purchasing quantity as an example assumption and revise it for the selected tile and actual pattern.
Do power point cutouts belong in the splashback estimate?
Yes when they affect tile cutting. Distinguish tile cuts from electrical device work, which may require its own scope.
FROM SCOPE TO PDF
Make your own kitchen splashback installation estimate.
Describe the actual job in Estimates on iPhone or Android, then review every quantity, rate and scope note. Add your business and client details, check the document and share an itemised PDF. Example amounts are fictional, and some app features may require an in-app purchase.