THE SHORT ANSWER
Estimate a paver walkway by installed area, material purchase area, edge length and site preparation. Confirm the route, grade and ground conditions before treating example quantities as a final construction plan.
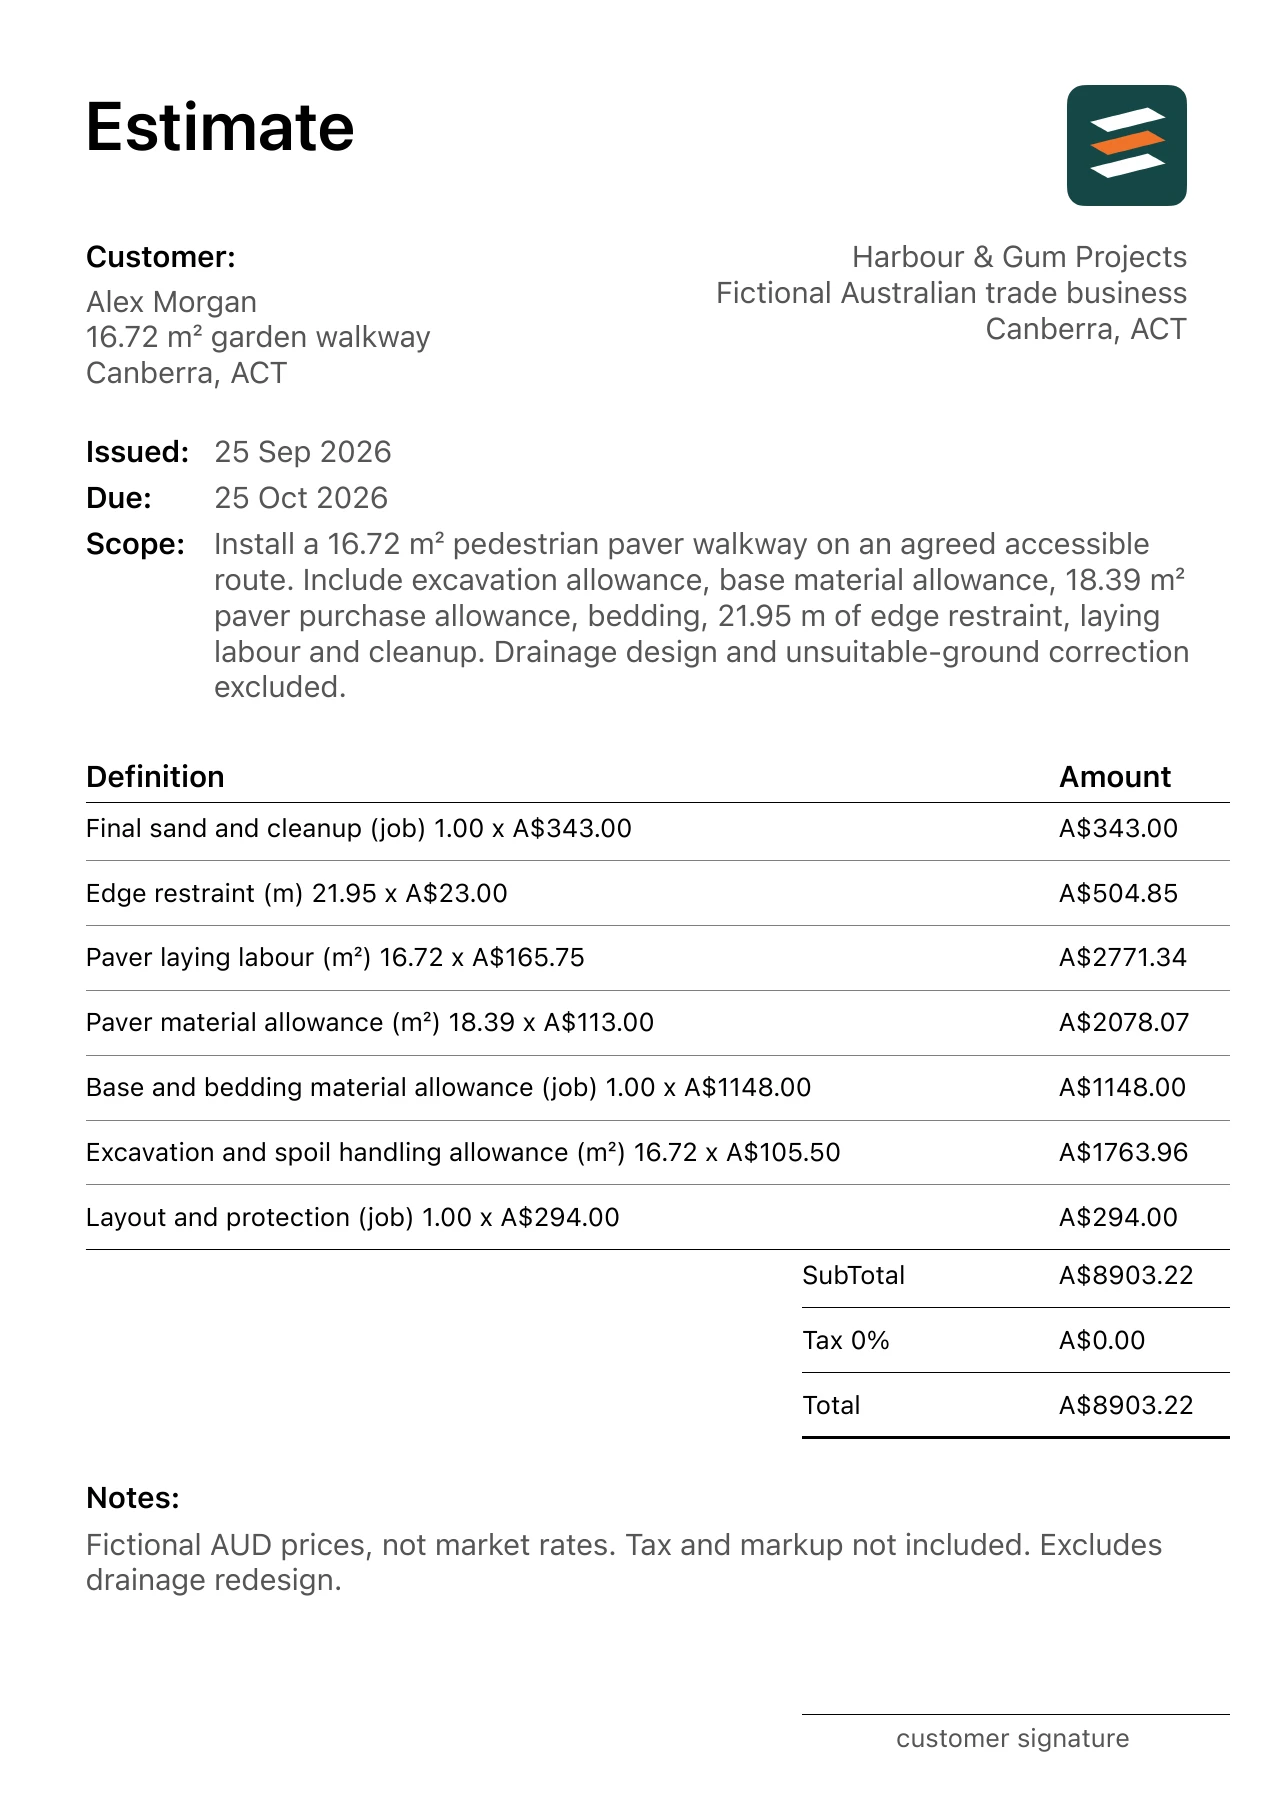
This Australian walkthrough uses a fictional 16.72 m² garden walkway in Canberra, Australian Capital Territory. The matching paver walkway installation estimate example shows the same item quantities and amounts in an app-exported PDF. Measure your own site and replace the example rates before issuing a client quote.
1. Lay out the path
Record width, length, curves and transitions. The installed area is 16.72 m²; the 18.39 m² product allowance reflects only this illustrative cutting layout.
For this example, the agreed starting scope is: Install a 16.72 m² pedestrian paver walkway on an agreed accessible route. Include excavation allowance, base material allowance, 18.39 m² paver purchase allowance, bedding, 21.95 m of edge restraint, laying labour and cleanup. Drainage design and unsuitable-ground correction excluded. A change to a listed surface, product or access assumption should trigger a revised line or allowance.
2. Inspect grade and ground
The sample assumes a suitable pedestrian route. Changes to drainage, roots or unsuitable soil need a site-specific design and separate price.
3. Count edges independently
Edge restraint follows the walkway perimeter and may not scale directly with surface area. Measure it from the selected geometry.
4. Describe the handoff
State joint fill, final cleanup and who handles excavated material. Avoid implying a vehicle-rated or engineered installation from a pedestrian walkway example.
Worked paver walkway installation calculation
Two checkable lines from the example are 16.72 m² × A$105.50 = A$1,763.96; 18.39 m² × A$113.00 = A$2,078.07. The full 7-line estimate totals A$8,903.22 with the demonstration tax input at 0%. The amount is a fictional scenario, not an Australian market rate or a recommended selling price.
Material purchasing and installed quantities may differ. For your own estimate, use the actual takeoff, supplier prices, labour plan, access and disposal requirements. Decide how overhead, profit and the applicable tax treatment affect your final quote; do not copy the example's zero tax setting.
Before you share the estimate
- Confirm route, dimensions and transitions.
- Inspect grade and soil.
- Measure edge restraint.
- Assign spoil handling and drainage design.
Scope boundary in this example: No drainage redesign, unsuitable-soil stabilization, retaining wall, lighting or vehicle-rated pavement.
Confirm the client details and location, item descriptions, measured units, total and validity date. If opening up the work reveals a different condition, document the changed scope and price before proceeding.
Common questions about paver walkway installation
Why are paver purchase and installed areas different?
Cut pieces and stock packaging can change purchasing. Show the assumption and revise it for the actual layout and product.
Can walkway area price edging?
No. Measure the length of edges that need restraint from the path layout.
FROM SCOPE TO PDF
Make your own paver walkway installation estimate.
Describe the actual job in Estimates on iPhone or Android, then review every quantity, rate and scope note. Add your business and client details, check the document and share an itemised PDF. Example amounts are fictional, and some app features may require an in-app purchase.