THE SHORT ANSWER
Estimate vinyl plank flooring by separating measured floor area, material purchase quantity, preparation, installation and transitions. Confirm the chosen product and substrate requirements before relying on a simple per-square-metre total.
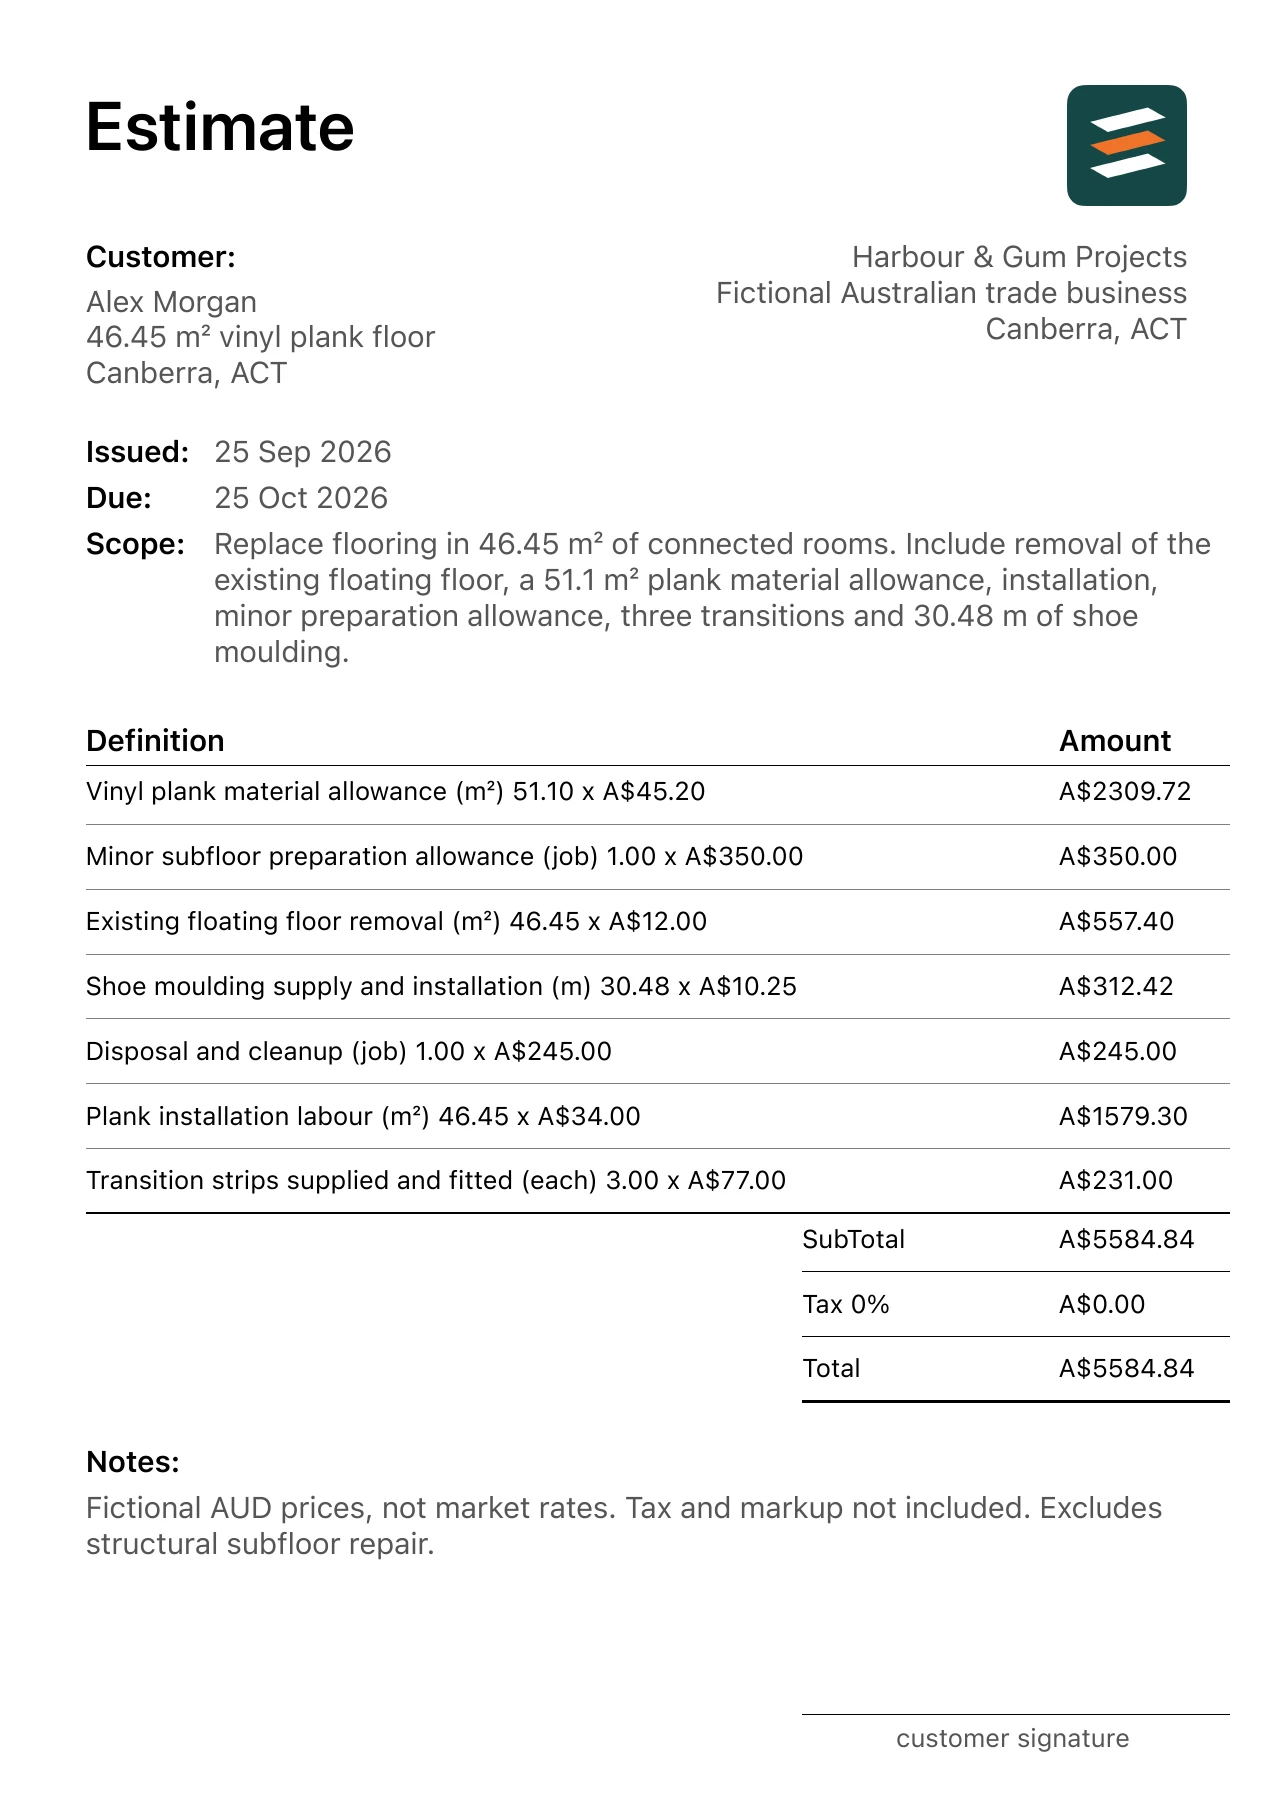
This Australian walkthrough uses a fictional 46.45 m² vinyl plank floor in Canberra, Australian Capital Territory. The matching vinyl plank flooring estimate example shows the same item quantities and amounts in an app-exported PDF. Measure your own site and replace the example rates before issuing a client quote.
How to calculate floor size for vinyl flooring and LVP packs
To calculate how much LVP you need, split an irregular room into rectangles, multiply each length by its width and add the areas. Use one measurement system throughout. Include recesses that will receive flooring and exclude only areas outside the agreed installation scope. Measure adjoining rooms individually so a missed doorway or small utility space does not disappear from the order.
Installed floor size and vinyl purchase coverage are different worksheet entries. Add the product- and layout-specific cutting allowance agreed with the installer, then divide by the supplier's coverage per pack and round up. Record the chosen installation type, transitions and edge finishing. Do not substitute an allowance for checking the actual layout, product directions and condition of the existing floor.
A vinyl plank flooring estimate should also identify removal, preparation and any furniture handling. A calculator supplies arithmetic once you provide these inputs; it does not diagnose subfloor condition or choose a compatible system. For a bulk flooring order, reconcile the room schedule against the total packs and keep product identification with the quote so later additions do not silently change the selection.
A separate worked planning example
Independent illustrative arithmetic: two assumed rectangles of 4 × 3 m and 4 × 2 m total 20 sq m. A hypothetical 10% allowance gives 22 sq m; packs covering 2.2 sq m each require 10 packs. These hypothetical inputs are not market rates and do not replace the amounts in the linked PDF.
Cost and scope questions
How much LVP do I need for several rooms?
Add the measured installed areas, agree the cutting allowance for the connected layout, then round the total purchase coverage to whole packs. Record each room so the total can be checked.
Should vinyl flooring labour use the extra purchase quantity?
Only if that is the contractor’s stated pricing basis. Normally the quote should distinguish installed area from pack coverage so any difference is transparent.
Flooring quantity calculator: vinyl, tile and pack ordering for Australian projects
1. Measure the installation footprint
Create a room-by-room takeoff and reconcile connecting areas so they are not counted twice. Identify wardrobes and doorways. Keep material purchasing allowances separate from the net area where the installer will lay the floor.
For this example, the agreed starting scope is: Replace flooring in 46.45 m² of connected rooms. Include removal of the existing floating floor, a 51.1 m² plank material allowance, installation, minor preparation allowance, three transitions and 30.48 m of shoe moulding. A change to a listed surface, product or access assumption should trigger a revised line or allowance.
2. Build a product-specific material allowance
The sample allows 51.1 m² for a 46.45 m² installation. That extra 4.65 m² is a planning assumption for this layout. Recheck the quantity against plank direction, cuts, cartons and the product selected by the customer.
3. Do not bury preparation
Removal may reveal uneven or unsuitable surfaces. Define the minor preparation included and how additional work will be measured and authorized. A vague preparation line should not imply that every possible substrate issue is covered.
4. Count the finishing pieces
Transitions, shoe moulding and door-related adjustments can be missed when the estimate focuses only on the open floor. Count them separately and state who moves appliances or heavy furniture. Review whether existing skirting boards remain or are replaced.
Worked vinyl plank flooring calculation
Two checkable lines from the example are 46.45 m² × A$12.00 = A$557.40; 51.1 m² × A$45.20 = A$2,309.72. The full 7-line estimate totals A$5,584.84 with the demonstration tax input at 0%. The amount is a fictional scenario, not an Australian market rate or a recommended selling price.
Material purchasing and installed quantities may differ. For your own estimate, use the actual takeoff, supplier prices, labour plan, access and disposal requirements. Decide how overhead, profit and the applicable tax treatment affect your final quote; do not copy the example's zero tax setting.
Before you share the estimate
- Reconcile room and wardrobe measurements.
- Confirm the exact plank and purchasing quantity.
- Identify subfloor preparation limits.
- Count transitions and perimeter trim.
Scope boundary in this example: No structural subfloor repair, moisture remediation, stairs, appliance relocation or major levelling.
Confirm the client details and location, item descriptions, measured units, total and validity date. If opening up the work reveals a different condition, document the changed scope and price before proceeding.
Common questions about vinyl plank flooring
Should waste be included in flooring labour?
Explain the measurement basis. In this example, the purchase allowance exceeds the installed area, while installation labour uses the measured 46.45 m².
How should I quote unknown subfloor repairs?
Describe the preparation included in the base scope, then identify additional repairs as a separate scope decision after inspection.
FROM SCOPE TO PDF
Make your own vinyl plank flooring estimate.
Describe the actual job in Estimates on iPhone or Android, then review every quantity, rate and scope note. Add your business and client details, check the document and share an itemised PDF. Example amounts are fictional, and some app features may require an in-app purchase.